Custom Fonts
Automatic.css lets you register your own self-hosted font files directly from the dashboard. When you configure a custom font, ACSS automatically outputs the @font-face rule for you, so you can use the font anywhere on your site without hand-writing any CSS.
You can register up to five custom fonts.
When to use custom fonts
Use this feature when you want to self-host a font (rather than loading it from a third-party service like Google Fonts). Self-hosting is the recommended approach for performance and privacy: the font is served from your own server, with no external requests.
If you only need a system font or a font that another plugin/theme already loads, you don't need to register it here — you can simply reference the font family name in your typography settings.
Step 1: Upload your font file
Before configuring anything in the dashboard, upload your font file(s) to your server — typically through the WordPress Media Library or via SFTP into /wp-content/uploads/.
.woff2 is the recommended format for the web because it offers the best compression and broad browser support.
Make note of the relative path to the file (for example, /wp-content/uploads/2025/your-font.woff2). You'll need it in the next step.
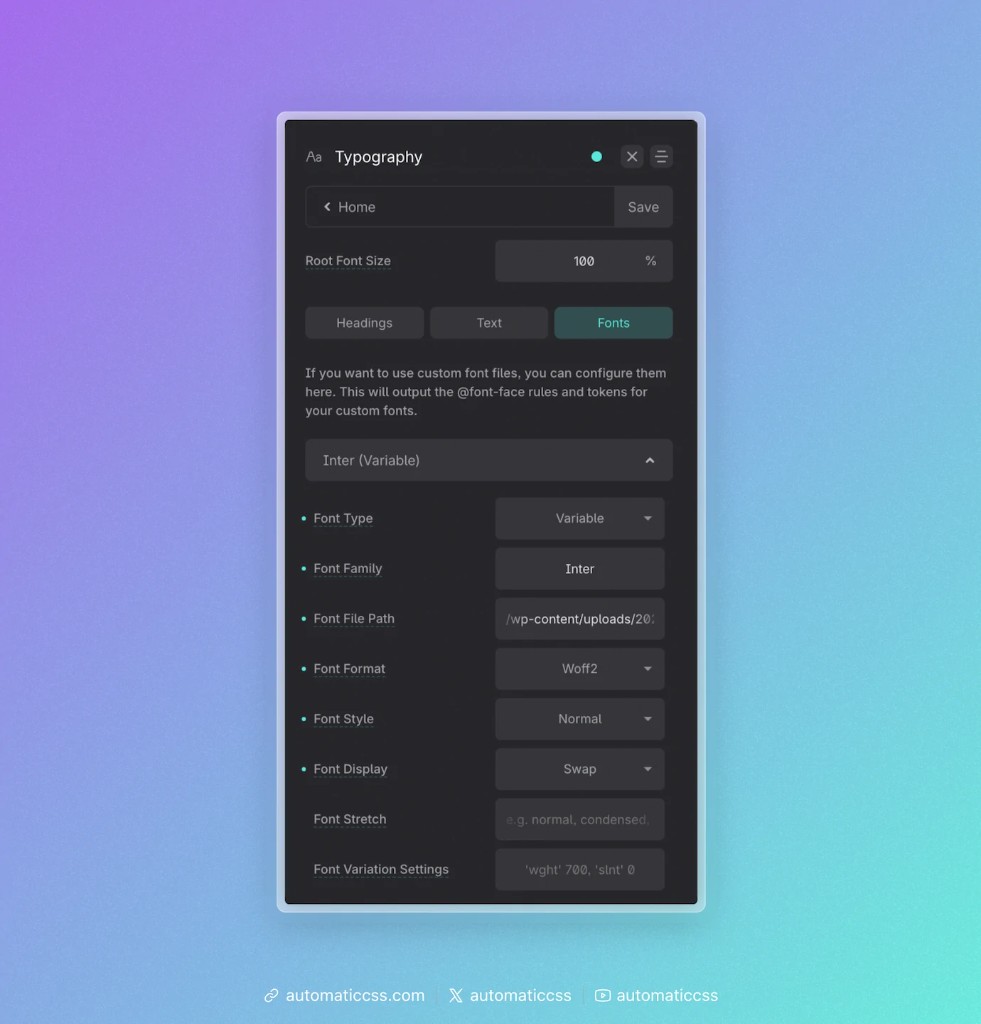
Step 2: Add the font in the dashboard
Open the Typography panel and switch to the Fonts tab. Expand one of the font accordions (Font 1–5) and fill in the fields.
| Field | Description |
|---|---|
| Font Type | Choose Static for a standard font file (one weight/style), or Variable for a variable font that contains multiple weights/styles in a single file. |
| Font Family | The name you'll use to reference this font. It can be anything you like — it's just a label (e.g. Inter). |
| Font File Path | The relative path to your uploaded font file (e.g. /wp-content/uploads/2025/your-font.woff2). |
| Font Format | The format of the file you referenced — woff2, woff, truetype, or opentype. |
| Font Style | Optional. The font-style for this file (normal, italic, or oblique). |
| Font Weight | (Static fonts only.) The font-weight of this file. Make sure it matches the actual file you uploaded (e.g. 400, 600, 700). |
| Font Display | Optional. The font-display strategy (auto, block, swap, fallback, or optional). swap is a common, performance-friendly choice. |
| Font Stretch | (Variable fonts only.) The font-stretch value (e.g. normal, condensed, expanded). |
| Font Variation Settings | (Variable fonts only.) The font-variation-settings value for the variable font (e.g. 'wght' 700, 'slnt' 0). |
Fallbacks
Each font has an optional Fallbacks section where you can provide a second Font File Path and Font Format. This isn't required, but it's good practice: if the primary file fails to load, the browser will try the fallback file instead.
Static vs. variable fonts
- A static font file contains a single weight and style. If you need multiple weights (e.g. regular and bold), upload each weight as its own font using the same Font Family name but a different Font Weight — the browser will pick the correct file automatically.
- A variable font packs many weights/styles into one file. Use the Font Stretch and Font Variation Settings fields to control how it renders.
When you're done, click Save. ACSS regenerates your stylesheet and the @font-face rule(s) are now active on your site.
Step 3: Use your custom font
Registering a font outputs the @font-face rule, but it doesn't automatically apply the font anywhere. To use it, reference the Font Family name you chose.
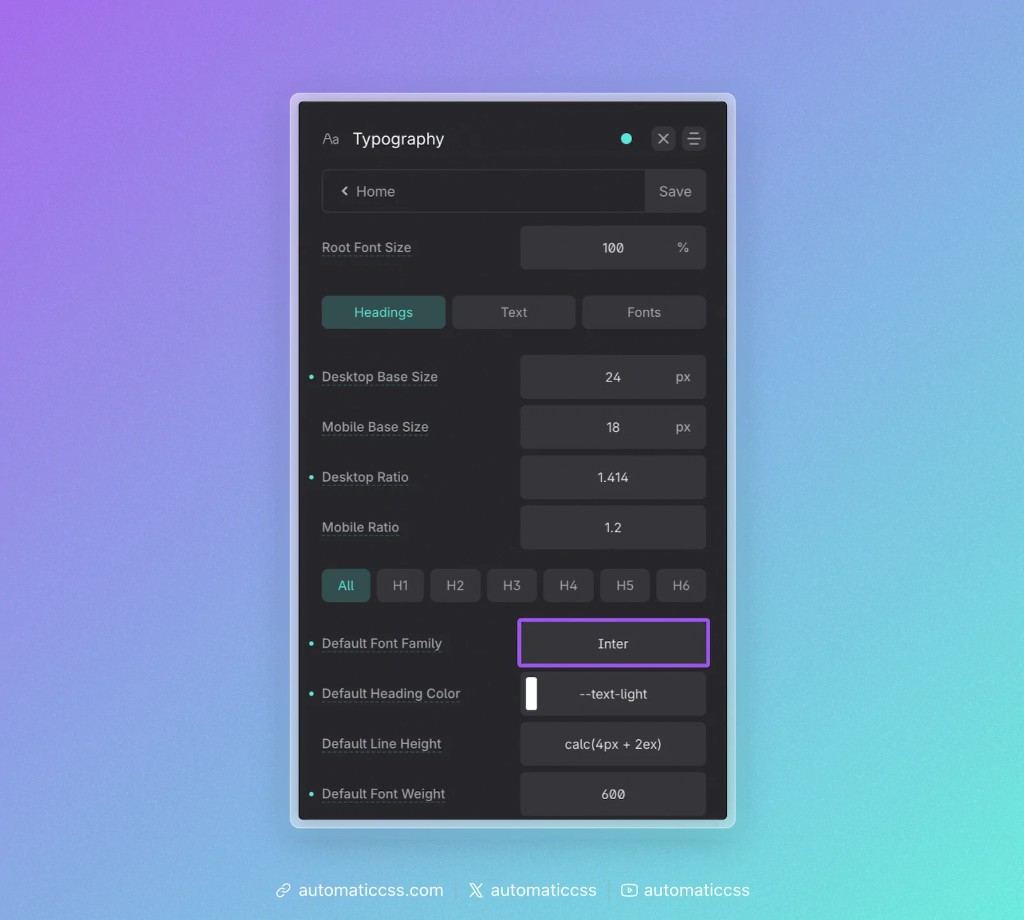
The most common way is to set it as your default heading or text font. In the Headings (or Text) tab, enter your font family name in the Default Font Family field. You can also override it per heading level (H1–H6) or per text size.
You can also reference your font anywhere in custom CSS, just like any other font family:
.my-element {
  font-family: "Inter", sans-serif;
}
Because ACSS exposes your typography settings as variables, you can also keep custom elements in sync with your global typography. See Typography Variables for details on variables like --heading-font-family and --text-font-family.
Tips & troubleshooting
- Use a relative path, not a full URL. Start the path at
/wp-content/.... - Match the format to the file. If you reference a
.woff2file, set the format towoff2. - Font not showing up? Double-check the file path is correct and the file is actually present on the server. Then make sure the Font Family name you typed in your typography settings exactly matches the name you used when registering the font.
- Weights look wrong? For static fonts, confirm the Font Weight you entered matches the weight of the file you uploaded.